Switch to a Linux Terminal Server Project network environment
Posted on April 27th, 2009
Get your old computers working as UNIX terminals! Setup a Linux Terminal Server with LTSP on Ubuntu, and use it from a remote workstation!
Im sick of losing machines, and having to reinstall from scratch, so if all goes well on this project, I will be able to run my blade server without even thinkiing about how to set each one up, beyond configuring each blade to boot from the Lan instead of the local hard drive, and instead concentrate on maintaining just the one central server.
Before you cry Single Point Of Failure – and it is, my comeback is that instead of having to make each server resilient, I only have to harden the one, saving time effort, and computer resources. Backups are essential, so I will have a remote machine rsync essential data on a CRON schedule. I will also improve the resilience of the server itself. This can be accomplished by having a couple of spare ethernet interfaces, a bit of software RAID (mirroring the partitions) and optionally a redundant hot/warm spare or even offline server knocking about will do for my purposes =)
To get an LTSP server running on an existing system running Ubuntu, Kubuntu, Xubuntu (which has an LTSP install option) or even Edubuntu, which sets up LTSP by default, you will need to set up a static Ethernet interface where you will attach the thin clients, install two packages and run a single command.
On the server (it can be a desktop, but for this scenario lets call it the server) configure your static / spare interface for the thin clients to have
the IP 192.168.1.1, then follow the instructions below.
sudo apt-get install ltsp-server-standalone openssh-server
Create your Thin Client environment on the server with.
sudo ltsp-build-client
After that, you will be able to boot your first thin client. Note that
if you want to use another IP than the above, you need to edit the
/etc/ltsp/dhcpd.conf
file to match the IP values and restart the dhcp server. If the IP changes (shame on you for not using IP aliases with IP/MAC address takeover tut tut) after you have done the initial setup, run
sudo ltsp-update-sshkeys
to make the ssh server aware of the change.
nb The ltsp-utils package from universe (for dapper) is for a different ltsp version, installing them together will break, so I gather. Maybe worth avoiding that, unless you have a test machine you can experiment on.
Obtaining, Trying and Installing Linux
Posted on April 27th, 2009
You can purchase Linux CD’s from the internet if you have a slow connection, have trouble downloading your fave distro or dont want to mess about burning install CD’s yourself.
Note that buying a CD does not mean that you are supporting that particular distribution, as the proceeds will likely go to the vendor who creates the CDs for their materials and labour. If you want to support a distribution financially, visit their website and look to see if there is a donate / merchandise store link. =)
However, you might want to reconsider downloading the distribution as you will get a more upto date revision, and you may find that some flavours of linux e.g. Ubuntu, Slax and Gentoo for starters allow you to run or install linux from a USB memory stick.
Other flavours may even allow you to download linux via bittorrent, such as BlueOnyx. You may wish to try several flavours before you select a particular one, as for example BlueOnyx is a great Server appliance distribution, but people who want to use linux on a single machine may well find that a Desktop edition is more tailored to their needs, e.g. Ubuntu, Kubuntu, Suse
tmobile usb3g on ubuntu / eee
Posted on January 20th, 2009
Updated May 2009!
I have been informed that after upgrading the eee to Ubuntu 9.04 the usb 3g stick no longer works. Even after recompiling the drivers against the kernel, and a few other attempts to solve it, it would appear that the USB-serial driver which the stick depended on is no longer in the kernel (can anyone verify?).
Current workaround for me is to stay on Ubuntu 8.10 a little while longer, and hope the manufacturer gets the updated drivers out soon =(
—
Having just recently aquired both an Asus EEE 901 and a t-mobile 530 usb 3g broadband stick, work began on figuring out how to install.
On a stock Ubuntu (8.10) distribution, download and extract the 2 tar.gz files. These contain the v1.6 driver (as opposed to the v1.2 in Ubuntu). The README and other documentation aren’t very clear, but this is basically how I did it. They might not work for you, so don’t blame me if you end up summonning Cthulhu all over your hard drive, or anything else nasty happens.
I’ve only put them here so I can download them to my own EEE after I replace Xandros by ethernet (The eee WiFi works, but the Xandros WPA is broken) and obviously, I cant use the usb3g yet…. 😉
# this disables the old option ZeroCD driver
echo “blacklist option” >> /etc/modprobe.d/blacklist
tar xzfmv hso-1.6.tar.gz
tar xzfmv udev.tar.gz
# now cd into each directory and
make install
reboot
I found that the system can crash if the stick is removed.
These are the files from the CD rom that came with the stick, I shall post the md5sums but they matched those available to download elsewhere, so you might as well use the CD if you have it.
Linux drivers:
hso-1.6.tar.gz: 30.05 KB
udev.tar.gz: 27.19 KB
EEE drivers (for Xandros?) – not required for Ubuntu
hso_connect.sh: 7.14 KB
hso-modules-2.6.21.4-eeepc_1.4-4+5_i386.deb: 30.13 KB
hso-udev_1.4-4_i386.deb: 21.03 KB
Edit: Sorry folks, looks like I’d messed up the urls, I’ve patched them now! =)
Create a new Samba user profile
Posted on January 14th, 2009
Just a quick one tonight – how to quickly add a new user profile in (Ubuntu) linux and export their home profile directory as a Samba share. (You need to add them twice, once for linux and once for Samba.)
# useradd -d /home/foo -m foo
# passwd foo
Enter new UNIX password:
Retype new UNIX password:
passwd: password updated successfully
# smbpasswd -a foo
New SMB password:
Retype new SMB password:
Added user foo.
a couple of things to note – you could use ‘adduser’ instead of useradd, but that will prompt you for the users info, which you may find you prefer (if in a non-scripted evironment)
also ‘smbpasswd foo’ might be required if, after running the command to add a new Samba user, it creates that user with a locked account – this should allow you to set the password and unlock them.
now connect to \\servername\username
Quick troubleshooting steps:
check all spellings in the /etc/samba/smb.conf
check spellings on windows client
read the comments in the smb.conf file! (especially the testparm hint!!)
Of course, I’m assuming you already know how to sudo apt-get install samba, configure your ‘[homes] directory exports in the smb.conf file, and restart samba ‘/etc/init.d/samba restart’. If not I got all I needed from:
google books (Hacking Ubuntu
By Neal Krawetz)
Ubuntu raid – postinstallation
Posted on January 10th, 2009
https://wiki.ubuntu.com/Raid has a simple script for creating a RAID array which you can adapt to your specific requirements – In my case I used it to add 2 shiny new 640GB drives to my Ubuntu machine after installing a copy of Ubuntu Desktop (I didnt bother reinstall the OS, I just added it as a data store. If my OS ever self-destructs, I can just boot off my USB drive and recover my data from there – although you may need to “sudo apt-get install mdadm”.
locate a package for Ubuntu
Posted on January 9th, 2009
OK I admin Im being lazy and didnt want to follow on from my last post by downloading and installing UltraMonkey by hand. But since I was away from my Ubuntu machine, I couldnt fire up Synaptic to see if there was a Ubuntu release of the package I wanted.
As discovered by a colleage of mine, http://packages.ubuntu.com/ is the answer – allows you to search for what you want via the web instead. Cheers, Matt! =)
Of course the package you want might not be listed, so perhaps it is available from another repository? Then you might find you need to edit your sources.list file.
Scripted or manual install of linux from scratch
Posted on January 5th, 2009
The page at http://ubuntuforums.org/showthread.php?t=293299 shows how to boot a Dapper/Edgy live CD and auto install an OS on a LUKS encrypted LVM.
I’ve posted it here because the script shows how to build the OS from the ground up – which is something I will try to perform on Intrepid.
ubuntu@ubuntu:~$ wget http://eli.criffield.net/auto_cr_inst-edgy
ubuntu@ubuntu:~$ chmod +x ./auto_cr_inst-edgy
ubuntu@ubuntu:~$ ./auto_cr_inst-edgy
If you want to learn even more about the basic building blocks of linux, try installing gentoo, or visit the Linux from scratch website
Convert MYSQL to UTF8 character set on Ubuntu 8.10
Posted on January 2nd, 2009
I used the following methods to convert my server to UTF-8, using standard Ubuntu packages, eg mysql-server from synaptix, nothing had to be recompiled.
They may not work in your environment. Use them at your own risk, and BACKUP everything first. (Preferably test before using it on any production server.) I post them only as a personal memory aid. If you use the information here and your server bursts into flames, you accept responsibility for that.
PuTTY /SSH:
In PuTTY 0.60 you can change the option “Window > Translation > Received data assumed to be in which character set:” to ‘UTF-8’. After this all received data will be interpreted as UTF-8 and displayed correctly. (For anyone ssh’ing to the mysql server and using the mysql> prompt from there!)
Bash:
try adding something like this to your ~/.bash_profile
echo -ne ‘\e%G\e[?47h\e%G\e[?47l’
There’s no point trying to work in UTF-8 if your computer thinks you are speaking ISO 8859-1!! This should even fix vi, so AltGr+4 correctly gives the Euro ‘€’ and AltGr+` [backtick] gives the broken pipe ‘¦’, instead of displaying nothing, or something odd like an accented A¦ pair. (or a dot in bash). Of course, Windows notepad will choke on the extended character, but something like notepad++ will work to display it.
MySQL:
A) Edit /etc/mysql/my.cnf, locate the section that starts [mysqld], add the lines below to configure your server, and then restart mysql. This should switch the server to UTF-8 ‘mode’.
[mysqld]
# utf8
init-connect=’SET NAMES utf8′
character-set-server=utf8
collation-server=utf8_general_ci
B) # /etc/init.d/mysqld restart
afterwards you should find the following all correctly updated to utf-8
> Variable Session value Global value
> character set client utf8 latin1
> character set connection utf8 latin1
> character set database latin1 latin1
> character set results utf8 latin1
> character set server latin1 latin1
> character set system utf8 utf8
> collation connection utf8_general_ci latin1_swedish_ci
> collation database latin1_swedish_ci latin1_swedish_ci
> collation server latin1_swedish_ci latin1_swedish_ci
This pinched from https://lists.ubuntu.com/archives/ubuntu-users/2006-February/067367.html because it was so very useful =)
C) Now follow this guide: http://www.nicknettleton.com/zine/php/php-utf-8-cheatsheet which you can also find copied below. Note that I was able to convert my latin1 encoded database (containing a wordpress blog) and all its tables (one-by-one) into utf8 using the below commands whilst the server was ‘hot’ – but take care! (and backups!!). Put db/table names with hyphens into backticks, e.g. `wp-blog`.
——–
To support worldwide languages, you need to use UTF-8 encoding for your web pages, emails and application, rather than ISO 8859-1 or another common western encoding, since these don’t support characters used in languages such as Japanese and Chinese.
Happily, UTF-8 is transparent to the core Latin characterset, so you won’t need to convert all your data to start using UTF-8. But there are a number of other issues to deal with. In particular, because UTF-8 is a multibyte encoding, meaning one character can be represented by more one or more bytes. This causes trouble for PHP, because the language parses and processes strings based on bytes, not characters, and makes mincemeat multibyte strings – for example, by splitting characters ‘in half’, bodging up regular expressions, and rendering email unreadable.
There are a number of great articles online about UTF-8 and how it works – Joel Spolski’s comes to mind – but very few about how to actually get it working with PHP and iron out all the bugs. So, here to save you the time we put in, is a quick cheatsheet and info about a few common issues.
1. Update your database tables to use UTF-8
CREATE DATABASE db_name
CHARACTER SET utf8
DEFAULT CHARACTER SET utf8
COLLATE utf8_general_ci
DEFAULT COLLATE utf8_general_ci
;
ALTER DATABASE db_name
CHARACTER SET utf8
DEFAULT CHARACTER SET utf8
COLLATE utf8_general_ci
DEFAULT COLLATE utf8_general_ci
;
ALTER TABLE tbl_name
DEFAULT CHARACTER SET utf8
COLLATE utf8_general_ci
;
2. Install the mbstring extension for PHP
Windows: download the dll if it’s not in your PHP extensions folder, and uncomment the relevant line in your php.ini file: extension=php_mbstring.dll
Linux: yum install php-mbstring
3. Configure mbstring
Do this in php.ini, httpd.conf or .htaccess. (Remember to prepend these with ‘php_value ‘ in httpd.conf or .htaccess.)
mbstring.language = Neutral ; Set default language to Neutral(UTF-8) (default)
mbstring.internal_encoding = UTF-8 ; Set default internal encoding to UTF-8
mbstring.encoding_translation = On ; HTTP input encoding translation is enabled
mbstring.http_input = auto ; Set HTTP input character set dectection to auto
mbstring.http_output = UTF-8 ; Set HTTP output encoding to UTF-8
mbstring.detect_order = auto ; Set default character encoding detection order to auto
mbstring.substitute_character = none ; Do not print invalid characters
default_charset = UTF-8 ; Default character set for auto content type header
4. Deal with non-multibyte-safe functions in PHP
The fast-and-loose way to do this is with the following php configuration:
mbstring.func_overload = 7 ; All non-multibyte-safe functions are overloaded with the mbstring alternatives
But there are problems with this. php.net has a warning about this potentially affecting the whole server. And even if this isn’t an issue for you, mbstring can make a mess of binary strings.
So, a better route is to search your application code for the following functions, and replace them with mbstring’s ‘slot-in’ alternatives:
mail() -> mb_send_mail()
strlen() -> mb_strlen()
strpos() -> mb_strpos()
strrpos() -> mb_strrpos()
substr() -> mb_substr()
strtolower() -> mb_strtolower()
strtoupper() -> mb_strtoupper()
substr_count() -> mb_substr_count()
ereg() -> mb_ereg()
eregi() -> mb_eregi()
ereg_replace() -> mb_ereg_replace()
eregi_replace() -> mb_eregi_replace()
split() -> mb_split()
5. Sort out HTML entities
The htmlentities() function doesn’t work automatically with multibyte strings. To save time, you’ll want to create a wrapper function and use this instead:
/**
* Encodes HTML safely for UTF-8. Use instead of htmlentities.
*
* @param string $var
* @return string
*/
function html_encode($var)
{
return htmlentities($var, ENT_QUOTES, ‘UTF-8’) ;
}
6. Check content-type headers
Check through your code for any text-based content-type headers, and append the UTF-8 charset, so the browser knows what it’s working with:
header(‘Content-type: text/html; charset=UTF-8’) ;
You should also repeat this at the top of HTML pages:
(replace square brackets with angle ones!!)
[meta http-equiv=”Content-type” value=”text/html; charset=UTF-8″ /]
7. Update email scripts
Email can be tricky. You’ll need to update the content-type for any emails and text-based mime parts to use UTF-8 encoding. You’ll also need to alter the way in which headers are encoded to use UTF-8. mbstring provides a function mb_encode_mimeheader() to handle this for you, but it does make a mess of address lists: you’ll need to encoding the name and address parts seperately, then compile them into an address list.
Be sure to encode the subject and other headers too – Korean speakers will tend to put Korean text for the subject.
9. Check binary files and strings
Finally, double check any binary files and strings handled by PHP, particularly uploads, downloads and encryption. In some cases it may be necessary to revert to ASCII just before a download or processing a binary string.
——–
MySQL clients:
Check the options in your mysql clients – should be switched to UTF8 mode also, or you might get your results in latin1, or something wierd like that.
Perhaps use tips from http://tlug.dnho.net/?q=node/276 if you are trying to mysqldump & restore from latin1 to utf8.
PHP:
Use the above to set your PHP / front end into UTF8 (see mbstrings section).
Ubuntu install RAID Encryption and LVM
Posted on December 29th, 2008
I’ve just spent 2 weeks installing Ubuntu 8.10 on my laptop, using software RAID 1 (mirroring), DM-Crypt / LUKS encrypted volumes and LVM partitions.
I only used the Alternate install CD – and I did it on a notebook without a network or other internet connection. We also only had a single 40GB HD – it was only for practice, and ideally we would do this in a server with 2 or more drives!!
— PROBLEM —
The problem was trying to layer the installation partitions in the following order:
RAID:ENCRYPTION:LVM
After all, the installer offers a guided Encrypted Volume with LVM installation – why shouldnt I try it this way round? Of course, we set an unencrypted 500MB ext3 partition for /boot.
We had a 40GB drive, so we split the remaining space into two 19GB primary partitions, and set the type as PV for RAID. we paired them into the mirror set /dev/md0. The install was happy to use the resulting /dev/md0 as PV for encryption, and accepted a password. We then set the type of the encrypted volume as PV for LVM. We assigned the 19GB PV to the Volume Group vg0, and created two logical volumes, 1GB for swap as lvswap, and used the remaining 18GB for /, as lvroot.
Installation progressed, installing packages for around 30 minutes, until it needed to reboot (not that the machine had booted from a liveCD or LiveUSB stick image, and had dynamically mounted the raided, encrypted, lvm volumes with no prior knowledge of them in any config files before the install)
At this point, I rebooted the machine, and after a while it gave up trying to mount the partitions, dropping to the BusyBox initramfs prompt.
It had mounted the RAID volume, and I could even do a cryptsetup luksOpen /dev/md0 /dev/mapper/vg0-crypt
why wouldnt it work????
— WORKAROUND —
We’ll we tried all sorts of things, generally waiting until the end of the install and pressing ALT+F2 to enter an alternative console. We figured the necessary /etc/fstab and /etc/crypttab files needed at boot time (currently located at /target/etc during the installation phase) were either missing or incorrectly setup, perhaps somthing to do with UUIDs for the block devices (nb not just /dev/sda, but /dev/md0 and the encrypted/LVM volume devices).
We got close. We gave up.
— SOLUTION —
In the end, we fixed it to use all three options. We even managed to mirror the /boot partition, to guard against the boot drive failing (no encryption or LVM for /boot)
Again, we kept RAID at the lowest level possible. We then divided the 19GB mirror set into two LVM phyiscal volumes, and then applied the encryption to each of the resulting volumes.
PV0 was 1GB in size, and assigned to Volume group VG0, which contained only one logical volume, lvswap, and was encrypted with a random key, to effectively scramble the data on each reboot.
PV1 used the remaining 18GB, and was used for a single LV, to contain the ‘/’ partition. This was encrypted with a passphrase. (dont use a random key for a partition with data you need to keep!)
Note that this is the point where you could use additional RAID / mirror sets, assigning more PVs to VGs, and creating even more LVs to contain filesystems mounted on /usr, /home and so on – but each additional mount point would need a passphrase entering to unlock the encrypted volume within, so I kept it to a simple, single ‘/’ volume.
My 40gb drive was laid out as follows:
physical block devs
/dev/sda1 – 500mb PV for RAID } as /dev/md0 {ext3}
/dev/sda2 – 500mb PV for RAID } “
/dev/sda3 – 19gb PV for RAID } as /dev/md1 {as PV for LVM}
/dev/sda4 – 19gb PV for RAID } “
(some unuseable space remained)
logical block devs
-> /dev/md0 mounted on /boot – ext3
-> /dev/md1 { 1gb as LVM – PV0} assigned to {VG0} containing {LVSWAP}
-> /dev/md1 { 18gb as LVM – PV1} assigned to {VG1} containing {LVROOT}
->/dev/mapper/lvswap as PV for ENCRYPTION {*random key*} mounted as swap
->/dev/mapper/lvroot as PV for ENCRYPTION {*passphrase*} mounted on / – ext3
Ubuntu Server VMware VA image
Posted on August 5th, 2008
You can download the same copy of Ubuntu server VA from which I will be basing my examples here. It is not the latest version, as upgrading the image will form part of my tutorial.
(Please note! I was not responsible for creating the VMware Virtual Appliance itself, any questions about it please direct to the author – see description below)
INSTRUCTIONS
http://nevynsblog.posmena.co.uk/VMwareUmbongo7.10srv.tar.gz contains:
Ubuntu7.10Server.README.txt
VMware-UbuntuServer-7.10.7z
VMware-UbuntuServer-7.10.7z.md5
If you are using Linux, download the file, and extract it into the current directory with “tar xzfmv ./VMwareUmbongo7.10srv.tar.gz”. You can “md5sum VMwareUmbongo7.10srv.tar.gz” and verify the file integrity by ensuring the output matches the contents of VMware-UbuntuServer-7.10.7z.md5 with “cat ./VMware-UbuntuServer-7.10.7z.md5”.
If you are on Windows, download WinRar from http://www.rarlabs.com/download.htm. This will handle extracting the .tar.gz and then the .7z file.
DESCRIPTION
The package also contains a readme file which you can read locally, but to spare you the 70MB download, I will repost here:
Ubuntu Server 7.10 (Gutsy Gibbon) Minimal Install
This is a standard (minimal) install of ubuntu 7.10 server, in a 69MB package. … username: toor password: password. you can issue commands as root using sudo …
www.vmware.com/appliances/directory/1060 – 9k
VMware Image – Ubuntu Server 7.10 (Gutsy Gibbon)
About:
This is a standard install of ubuntu 7.10 server, in a 75MB package.
This VM can be usefull for quickly deploying a base operating system from a small package, and with a minimal configuration time (about 2 minutes).
Some steps were taken to reduce the archive size down to a minimum:
* Some temporary data has been removed from /var (namely apt cache, installer logs, etc).
* The partition was also cloned to a new .vmdk as a part of the shrink process.
* The archive is in 7-Zip format (GPL – search you package manager or grab it from http://www.7-zip.org).
Aditional software included:
* The only extra package installed was ssh-server.
Login details:
username: toor
password: password
you can issue commands as root using ’sudo ‘ or enable the root user issuing the command ’sudo passwd root’.
VM Configuration:
Uppon login, your first action should be to run the ‘configure.sh’ script using ’sudo ./configure.sh’. this will enable you to configure:
* Keyboard,
* Timezone
* Password
* Hostname
* Network interface(s)
* DNS
Download:
Grab it here: VMware-UbuntuServer-7.10.7z. ( http://www.jcinacio.com/down/vmware/ubuntu-server-7.10-1/VMware-UbuntuServer-7.10.7z )
Also, md5 checksum ( http://www.jcinacio.com/down/vmware/ubuntu-server-7.10-1/VMware-UbuntuServer-7.10.7z.md5 ) and gpg signature ( http://www.jcinacio.com/down/vmware/ubuntu-server-7.10-1/VMware-UbuntuServer-7.10.7z.asc ) (key id: 0×146379A4).
If you find this appliance useful in any way, please link to this site.
Contact:
* Joao Inacio or at http://www.jcinacio.com
Changelog:
* 18 October 2007
– Initial release
* 20 October 2007
– Fixed network interface (eth0) name change due to new UUID

Coding is our passion
Usualy accompanied by a caffeinated beverage - although we’re more likely sipping a latte than some Jolt! cola these days!
If you found anything on this site useful and want to say thanks, then you could always:
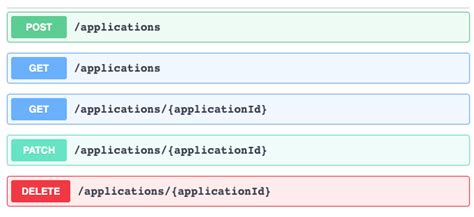
Microservices and RESTful APIs
We work with your company in a constructive way to refine your vision, exploring the Art-of-the-Possible, help write IaC (Infrastructure-as-Code) with Terraform, promote a DevOps culture and build a World Class Cloud Platform.
We can also provide help to go from the very basics of designing your API contract in Swagger/OAS to building a container by writing a Dockerfile, through to a creating a fully orchestrated CI/CD pipeline in Jenkins to deploy to Rancher, Kubernetes and Istio. We can help set up Kong API Gateways, and lots more besides!
More
Feedback:
“ Kevin is a highly talented developer with excellent dev ops skills and a passion for quality driven work flows. I've had the pleasure of working with Kevin and he has brought many new skills and approaches to the team. He is an undisputed GIT geek. Is overall nice guy dedicated to doing the best work he can do, and has been a great mentor to the less experienced team members. ”
– Stu Craigen
Donec dictum
-
The three pillars
-
Fusce ultrices fringilla metus
Donec leo, vivamus fermentum nibh in augue praesent a lacus at urna congue rutrum.
-
Donec dictum metus in sapien
Donec leo, vivamus fermentum nibh in augue praesent a lacus at urna congue rutrum.
Nulla leifend
Donec placerat odio vel elit. Nullam ante orci, pellentesque eget, tempus quis, ultrices in, est. Curabitur sit amet nulla. Nam in massa. Sed vel tellus. Curabitur sem urna, consequat.


