BOOTP server
Posted on May 10th, 2009
Setting up a BOOTP / TFTP server sounds tricky, but in reality it is marvellously simple. I used it to install IRIX over the network,on my SGI’s.
In this example I shared IRIX 5.3 from my Origin 200 running IRIX 6.5.xx to my Indigo R3000. If you are struggling with SCSI bus reset errors from that old cdrom drive, this is a much simpler route to take.
on the server:
- /etc/hosts – not required initially, but lets you address the client by hostname from the server.
- /etc/ethers – specify the mac address of the client(s)
08:00:69:c0:ff:ee iris
- /etc/bootptab – this specifies the hostname, IP, (mac?) and the directory to boot.
iris 1 08:00:69:c0:ff:ee 192.168.1.118 /cds/irix53/stand/sash.IP12 - /etc/inetd.conf – here you enable the bootp and tftpd services. It is advised that you use the -s switch to specify which directory(ies) the user can see, otherwise they will have access to all world readable ones (not so bad on a closed network, still better to specify though).
bootp dgram   udp   wait  root    /usr/etc/bootp  bootp
tftp dgram udp wait guest /usr/etc/tftpd tftpd -s /cds/irix53 - finish with this command: /etc/killall -HUP inetd
on the client
enter the command monitor by selecting option 5, and a quick hinv -v to double check all the hardware is recognised may avoid confusion later on.
setenv netaddr 192.168.1.118
setenv notape 1
boot -f bootp()192.168.1.9:/path/to/diskimage/stand/fx.IP12 –x
now repartition / format the drive as necessary (I had to do this a couple of times, it appeared to keep the old installation the first time, and the second time, the amount of freespace was well below the 2GB capacity, which left me with 2 failed installations, but was successful on the third attempt – hint: during the inst phase, I selected the admin commands and looked for the mkfs option. Even though the miniroot was copied to the drive, I wiped it clean – it recovered from the shock by offering to restart the interrupted distribution.
Right, now you’ve hopefully got a clean drive – restart and
setenv netaddr 192.168.1.118
setenv notape 1
boot -f bootp()192.168.111.9:/path/to/diskimage/stand/sash.IP12
install -n
for some reasoon, this didnt work too well for me, it kept looking for /dev/tape and I couldnt trick it by setenv tapedevice /path/to/diskimage =(
in this case, just select option 2, install the os.
are you using remote tape [y/n] : n
enter the hostname:directory – 192.168.1.119:/path/to/diskimage/dist
once you have the miniroot, and inst running, you should be able to select additional distributions by setting the ‘from’ to /path/to/disk2image/dist, as appropriate.
HINTS:
This assumes the server is IP 192.168.1.119, and the client is 192.168.1.118
It also assumes you have copied the IRIX 5.3 disc from /CDROM to /cds/irix53/ on the server.
BOOTP wont work across a router, but if you can NFS mount the files across the router, you could establish a nearby BOOTP server on the local segment.
In order to edit the files, especially on a text console, a quick ‘man vi’ should help
serial port settings are often 9600-8n1 no flow control, see ‘man serial’
LINKS:
securing IRIX (more 6.5.xx specific, but still useful)
http://www.blacksheepnetworks.com/security/resources/IRIX_65.html
http://sgistuff.g-lenerz.de/tips/security.php
http://www.siliconbunny.com/irix-security/
Apple OSX admin tips, running webmin, usermin and openSSL
Posted on April 27th, 2009
These are some notes I took whilst enabling remote https:// administration of my Mac running OSX. Webmin provides a nice web gui for administration of your server, but you would probably want to restrict access to localhost, a few known and trusted hosts, or IPs on the local lan subnet for security. In addition, using OpenSSL makes this a better solution, if you prefer a gui console or do not have access to ssh / command line. Newer versions will always come out, please check – and note that this information can only serve as a ‘rough guide’.
Some things you might find useful before we begin:
—-
Use NetInfo manager, authenticate and enable root user
http://forums.ionmac.com/lofiversion/index.php/t309.html
use
$ defaults write com.apple.finder ShowAllFiles -boolean YES
(instead of $ defaults write com.apple.finder ShowAllFiles True )
this is also cool
$ defaults write “Apple Global Domain” AppleScrollBarVariant DoubleBoth
—-
installing perl / Net_SSLeay for SSL access is easy – just visit http://www.webmin.com/osx.html and follow directions
These instructions, contributed by Kevin Capwell, will allow you to install webmin on any Apple Macintosh OS X server. The version that I was using is as follows:
Server: 10.3
Perl: 5.8.1-RC3 to see version open terminal,
$ cd /usr/bin, then type
$ perl –version
OpenSSL: 0.9.7b to see version open terminal,
$ cd /usr/bin, then type
$OpenSSL version
INSTALL DEVELOPER TOOLS (i.e. use OS X 10.3 XCode CD and update!)
1. Go to https://connect.apple.com/ and become a member of ADC – it’s free!
2. Click on ‘Download Software’.
3. Click on ‘Developer Tools’.
4. Download the Xcode Tools v1.0 and 1.0.1 update. As
of this writing download the Xcode CD is in 20 parts,
however, Xcode should come with your box copy of 10.3.
5. Click twice on the Xcode.dmg icon.
6. Click twice on the ‘Developer’ package.
7. Enter your administrator password when you are
prompted.
8. After selecting the drive to install the developer
tools, then click the ‘Customize’ button. Make sure
the check the BSD SDK option.
9. Perform the install.
INSTALL THE NET_SSLEAY.PM
1. Download and install the Perl Mod “Net::SSLeay”
2. Go to the web page
http://www.cpan.org/modules/by-module/Net/
3. Download the ‘Net_SSLeay.pm-1.25.tar.gz’. This version was tested with the perl and openssh that are installed with 10.3. In my case this is Perl 5.8.1 and
OpenSSL 0.9.7b (to see your versions look at the commands above)
4. I copied the Net_SSLeay.pm-1.25.tar.gz to /usr/local
5. tar -zxvf Net_ssleay.pm-1.25.tar.gz
6. cd Net_ssleay.pm-1.25
7. type ‘perl Makefile.PL -t’ (without the quotes builds and tests) You should see a successful install message
8. Issue the ‘sudo -s’ command (without the quotes) – enter your admin password. You should now see a root# prompt at the beginning of each line you type.
9. Type ‘make install’ (without the quotes).
10. If the command “perl -e ‘use Net::ssleay'” (without the “” quotes) doesn’t output any error message, then the ssl support that webmin needs is
properly installed.
INSTALL THE AUTHEN_PAM.PM
1. Download and install the Perl Mod “Authen::PAM”
2. Go to the web page
http://www.cpan.org/modules/by-module/Authen/
3. Download the ‘Authen-PAM-0.15.tar.gz’ file
4. I copied the Authen-PAM-0.15.tar.gz to /usr/local
5. tar -zxvf Authen-PAM-0.15.tar.gz
6. cd Authen-PAM-0.15
7. type ‘perl Makefile.PL -t’ (without the quotes builds and tests) You should see a successful install message
8. Issue the ‘sudo -s’ command (without the quotes) – enter your admin password. You should now see a root# prompt at the beginning of each line you type.
9. Type ‘make install’ (without the quotes).
INSTALL WEBMIN
1. Go to http://www.webmin.com/download.html
download the current Unix tar/gzip version.
2. I copied the webmin-1.340.tar.gz to /usr/local
3. tar -zxvf webmin-1.340.tar.gz
4. cd webmin-1.340
5. type ‘./setup.sh’ (without the quotes).
6. Accept defaults for config and log file directory (one return for each will do)..
7. Accept the default path to perl (it should test ok).
8. Accept the default port for webmin (port 10000).
9. Login name can be anything you want (the default is admin).
10. Login password can be anything you want. Then you will be asked to verify the password.
11. If you followed the instructions above correctly you will be prompted with ‘Use SSL (y/n):’ you can now answer Y. This will encrypt your connections with the Xserve.
12. Answer Y to Start Webmin at boot time.
13. After the install is complete, copy the file
pam-webmin to /etc/pam.d/webmin and re-start Webmin with /etc/webmin/stop ; /etc/webmin/start. This will enable PAM authentication, if you need it.
If everything installs correctly you will see ‘Webmin has been installed and started successfully. Use your web browser to go to:
https://:10000
and login with the name and password that you entered
previously.
INSTALL USERMIN
1. Go to http://www.webmin.com/udownload.html
download
the current Unix tar/gzip version.
2. I copied the usermin-1.270.tar.gz to /usr/local
3. tar -zxvf usermin-1.270.tar.gz
4. cd usermin-1.270
5. type ‘./setup.sh’ (without the quotes).
6. Accept defaults for config and log file directory (one return for each will do).
7. Accept the default path to perl (it should test ok).
8. Accept the default port for webmin (port 20000).
9. If you followed the instructions above correctly you will be prompted with ‘Use SSL (y/n):’ you can now answer Y. This will encrypt your connections with the Xserve.
10. After the install is complete, copy the file pam-usermin to /etc/pam.d/usermin and re-start Usermin with /etc/webmin/stop ; /etc/webmin/start. This will enable PAM authentication for all users who login.
Usermin is useful for changing passwords and (optionally) reading mail. It is a terrific user tool with security built in. I highly recommend that you
experiment with it for ease of use with your users.
Fujitsu SPARC servers
Posted on April 27th, 2009
If you a meaty Unix Server to run Solaris on have a look at Fujitsu SPARC Unix Servers – enterprise class!!
Of course, It probably wont be long until we are seeing Oracle branded servers…
(I, for one, welcome the new corporate overlords)
UNIX command line tips (intermediate)
Posted on April 19th, 2009
It is often seen that when one is using a system he/she tends to fall into set usage patterns. This leads to development of habit of doing things in improper way. In order to overcome these problems the best way is to carefully pick up good habits that offset them.
The following are the 10 UNIX command-line habits worth picking up — good habits that helps one break many common usage foibles and makes one more productive at the command line in the process:
One must try to inculcate these 10 good habits.
1. One should make directory trees in a simple filch: It is really quite simple and faster to use the -p option to mkdir and to make all parent directories along with their children in a single command. However the administrators often ignore this option that are even familiar with this. Thus one should keep this point in mind.
2. One should change the path but not the archive: One can use this option in order to make entire complex directory trees, which are great to use inside scripts; not just simple hierarchies.
3. One should combine his/her commands with control operators: One should define complex directory trees with single command only.
4. One should use escape sequences in order to manage inputs, which are long enough.
5. One should group his/her commands together in a list.
6. One should use xargs outside of find.
7. One should quote variables with great caution.
8. One should use backslash for long input.
9. One should match certain fields in output and not just lines.
10. One should know when grep should do the counting and when it should come aside.

Coding is our passion
Usualy accompanied by a caffeinated beverage - although we’re more likely sipping a latte than some Jolt! cola these days!
If you found anything on this site useful and want to say thanks, then you could always:
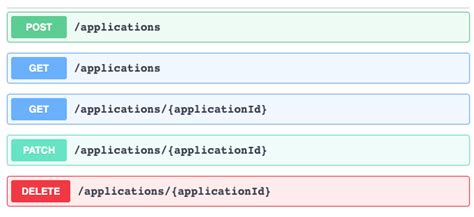
Microservices and RESTful APIs
We work with your company in a constructive way to refine your vision, exploring the Art-of-the-Possible, help write IaC (Infrastructure-as-Code) with Terraform, promote a DevOps culture and build a World Class Cloud Platform.
We can also provide help to go from the very basics of designing your API contract in Swagger/OAS to building a container by writing a Dockerfile, through to a creating a fully orchestrated CI/CD pipeline in Jenkins to deploy to Rancher, Kubernetes and Istio. We can help set up Kong API Gateways, and lots more besides!
More
Feedback:
“ Kevin is a highly talented developer with excellent dev ops skills and a passion for quality driven work flows. I've had the pleasure of working with Kevin and he has brought many new skills and approaches to the team. He is an undisputed GIT geek. Is overall nice guy dedicated to doing the best work he can do, and has been a great mentor to the less experienced team members. ”
– Stu Craigen
Donec dictum
-
The three pillars
-
Fusce ultrices fringilla metus
Donec leo, vivamus fermentum nibh in augue praesent a lacus at urna congue rutrum.
-
Donec dictum metus in sapien
Donec leo, vivamus fermentum nibh in augue praesent a lacus at urna congue rutrum.
Nulla leifend
Donec placerat odio vel elit. Nullam ante orci, pellentesque eget, tempus quis, ultrices in, est. Curabitur sit amet nulla. Nam in massa. Sed vel tellus. Curabitur sem urna, consequat.


